前言

Java异常类(Exception)是用来处理异常程序行为的一组类。在这篇文章中,我将介绍如何使用Java异常类,以及在程序中如何设计Java异常体系。Exception类是Java体系中非常重要的一环,每一个程序员都必须熟悉并掌握它。

Java异常承载的信息量超乎你的想象

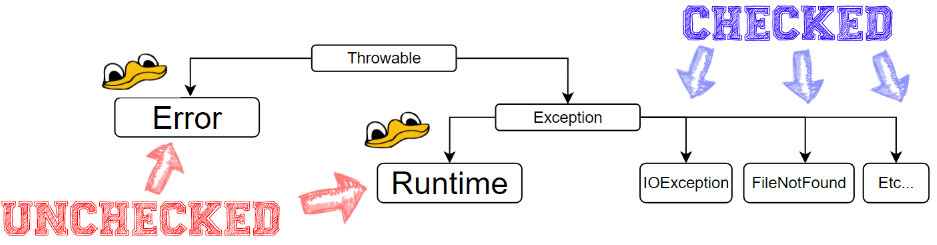
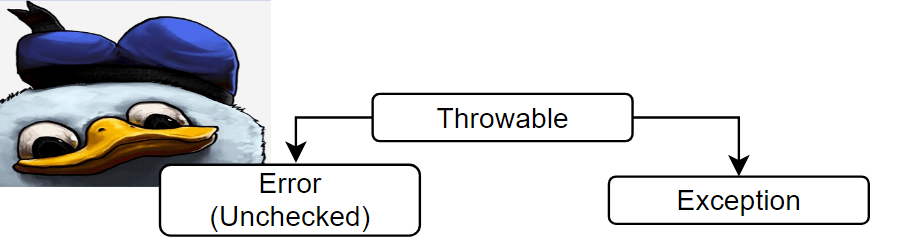
Java Exception的结构设计本身就可以提供给开发者非常多的信息(如果开发者可以恰当的利用这一结构)。Exception结构如下图所示:

Throwable是整个异常结构的父类,它有两个子类,分别是ErrorException

Java Error

Error类代表出现非正常场景,一旦Error异常出现,整个应用程序可能崩溃。

Java Exception

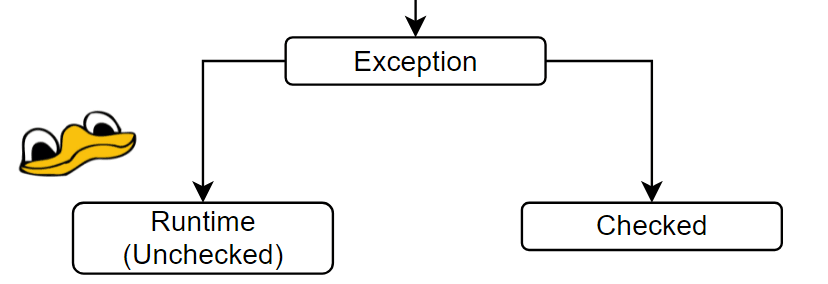
ExceptionError类不同,当这种类型的异常出现时,程序是可以尝试恢复并继续运行的。Exception异常有以下两类,运行时异常(Runtime Exception)和非运行时异常(Not Runtime Exception):

非运行时异常也成为checked异常,这一类异常和Error异常非常类似,二者的区别在于程序在抛出checked exception有更高的几率恢复正常。

Checked 和 Unchecked异常

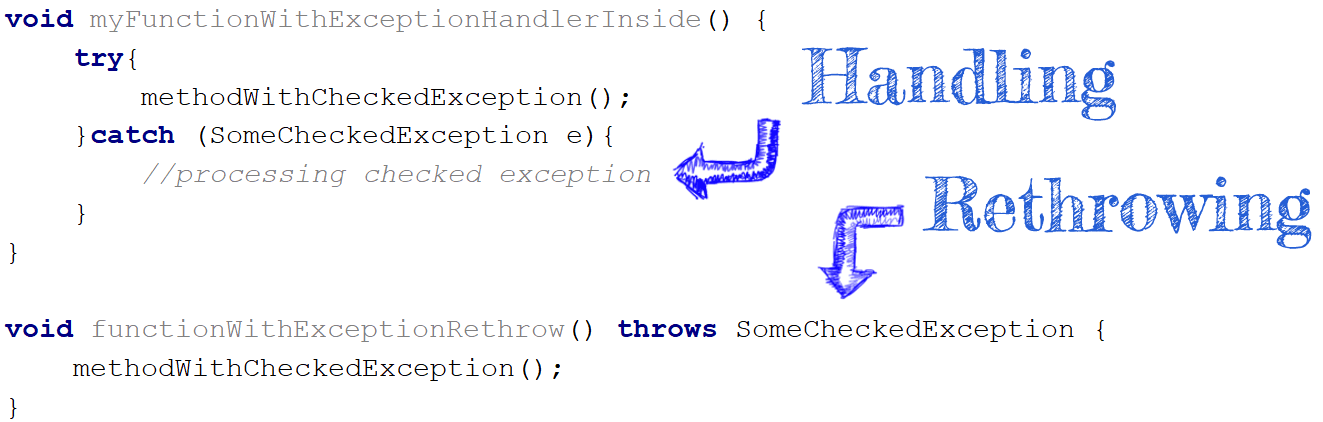
Checked异常强制开发者在程序中进行处理或再次抛出。如果checked异常被重新抛出,则需要在方法中用throws语法声明该异常。与之相反,Unchecked异常不需要特殊处理。这种设计结构意味着不主动处理的unchecked异常将会被抛到根类。

如何在JAVA中进行异常处理

Java中有两种方式处理异常:在当前方法中处理或者是重新抛出。你可能需要一个父异常处理器,或者是执行一些其它特定逻辑,如进行重试。

如上文所示,我们可以将异常拆分成三类:Checked,Runtime和Error。它们分别在不同的场景下抛出,代表程序可以恢复的程度。最乐观的是Checked异常,Runtime异常相对而言可恢复的可能性更小,最糟糕的是Error类型异常。

在了解了异常的类型后,我们就可以试着回答以下问题:

  • 程序当前情况有多糟糕? 问题的原因是什么?
  • 如何修复问题?
  • 需要重启JVM吗?
  • 需要重新编写代码吗?

熟悉异常后意味着我们可以推测程序是哪里出现了问题,并且试着修复它。下面的章节会展示几个经典的异常场景并分析原因(假设程序已经通过了编译自测阶段)

阅读全文 »

前言

Mybatis Generator插件可以快速的实现基础的数据库CRUD操作,它同时支持JAVA语言和Kotlin语言,将程序员从重复的Mapper和Dao层代码编写中释放出来。Mybatis Generator可以自动生成大部分的SQL代码,如update,updateSelectively,insert,insertSelectively,select语句等。但是,当程序中需要SQL不在自动生成的SQL范围内时,就需要使用自定义Mapper来实现,即手动编写DAO层和Mapper文件(这里有一个小坑,当数据库实体增加字段时,对应的自定义Mapper也要及时手动更新)。抛开复杂的定制化SQL如join,group by等,其实还是有一些比较常用的SQL在基础的Mybatis Generator工具中没有自动生成,比如分页能力,悲观锁,乐观锁等,而Mybatis Generator也为这些诉求提供了Plugin的能力。通过自定义实现Plugin可以改变Mybatis Generator在生成Mapper和Dao文件时的行为。本文将从悲观锁为例,让你快速了解如何实现Mybatis Generator Plugin。

实现背景:
数据库:MYSQL
mybatis generator runtime:MyBatis3

阅读全文 »

问题描述

最近在公司新建了一个JAVA微服务,采用的是springboot框架,logback作为日志模块的实现。在搭建的的过程中想起之前在文档中看到springboot支持用logback-spring.xml作为定制的logback配置文件。在这个文件中可以使用spring的定制化标签,比如可以根据当前生效的profile对日志文件进行配置,从而省去配置多份日志文件并在profile中指定具体当前生效的配置。在阅读了一下教程之后,我在resources目录下新建了logback-spring.xml的配置文件,内容如下:

1
2
3
4
5
6
7
8
9
10
11
12
13
14
15
16
17
18
19
20
21
22
23
24
25
26
27
28
29
30
31
32
33
34
35
36
37
38
39
40
41
42
43
44
45
46
47
48
49
50
51
52
53
54
55
56
57
58
59
60
61
62
63
64
65
66
67
68
69
70
71
72
73
74
75
76
77
78
79
<configuration scan="true" scanPeriod="100000" debug="false">

<include resource="org/springframework/boot/logging/logback/defaults.xml"/>

<property name="LOG_BASE" value="logs/"/>

<appender name="CONSOLE" class="ch.qos.logback.core.ConsoleAppender">
<encoder>
<pattern>${FILE_LOG_PATTERN}</pattern>
</encoder>
</appender>

<!-- 所有应用日志 -->
<appender name="FILE" class="ch.qos.logback.core.rolling.RollingFileAppender">
<file>${LOG_BASE}/application.log</file>
<rollingPolicy class="ch.qos.logback.core.rolling.SizeAndTimeBasedRollingPolicy">
<!-- rollover daily -->
<fileNamePattern>${LOG_BASE}/application.log-%d{yyyy-MM-dd}.%i</fileNamePattern>
<!-- each file should be at most 500MB, keep 60 days worth of history, but at most 20GB -->
<maxFileSize>500MB</maxFileSize>
<maxHistory>60</maxHistory>
<totalSizeCap>20GB</totalSizeCap>
</rollingPolicy>
<encoder>
<pattern>${FILE_LOG_PATTERN}</pattern>
</encoder>
</appender>
<appender name="ASYNC-FILE" class="ch.qos.logback.classic.AsyncAppender">
<!-- 不丢失日志 -->
<discardingThreshold >0</discardingThreshold>
<!-- 更改默认的队列的深度,该值会影响性能.默认值为256 -->
<queueSize>512</queueSize>
<!-- 添加附加的appender,最多只能添加一个 -->
<appender-ref ref ="FILE"/>
</appender>

<!-- ERROR日志 -->
<appender name="ERROR" class="ch.qos.logback.core.rolling.RollingFileAppender">
<file>${LOG_BASE}/application-error.log</file>
<rollingPolicy class="ch.qos.logback.core.rolling.SizeAndTimeBasedRollingPolicy">
<!-- rollover daily -->
<fileNamePattern>${LOG_BASE}/application-error.log-%d{yyyy-MM-dd}.%i</fileNamePattern>
<!-- each file should be at most 500MB, keep 60 days worth of history, but at most 20GB -->
<maxFileSize>500MB</maxFileSize>
<maxHistory>60</maxHistory>
<totalSizeCap>20GB</totalSizeCap>
</rollingPolicy>
<encoder>
<pattern>${FILE_LOG_PATTERN}</pattern>
</encoder>
<filter class="ch.qos.logback.classic.filter.ThresholdFilter">
<level>ERROR</level>
</filter>
</appender>
<appender name="ASYNC-ERROR" class="ch.qos.logback.classic.AsyncAppender">
<!-- 不丢失日志 -->
<discardingThreshold >0</discardingThreshold>
<!-- 更改默认的队列的深度,该值会影响性能.默认值为256 -->
<queueSize>512</queueSize>
<!-- 添加附加的appender,最多只能添加一个 -->
<appender-ref ref ="ERROR"/>
</appender>


<springProfile name="local | boe">
<root level="DEBUG">
<appender-ref ref="CONSOLE"/>
<appender-ref ref="ASYNC-FILE"/>
</root>
</springProfile>
<springProfile name="!(local | boe)">
<root level="INFO">
<appender-ref ref="CONSOLE"/>
<appender-ref ref="ASYNC-FILE"/>
<appender-ref ref="ASYNC-ERROR"/>

</root>
</springProfile>
</configuration>

这个配置文件中重点关注springProfile这个标签,这个是spring定制的标签,根据当前生效的profile来决定使用哪一段配置,在这里当生效的profile=local或者boe时,会采用上面这段配置,反之则采用下面这段配置。本质上是期望在测试环境时将日志的级别调整为DEBUG,而到生产环境是则将级别调整为INFO并专门将ERROR日志输出到ERROR文件中便于排查。但是在测试时发现这个配置并没有生效,在测试环境也打印了ERROR文件、

排查过程

在询问谷歌无果后,通过在应用程序启动的时候打断点进行排查。springboot通过org.springframework.boot.logging.logback.LogbackLoggingSystem这个类在应用启动的时候解析logback配置文件。这个类是LoggingSystem这个类的子类,而LoggingSystem类下还有其它的子类包括JavaLoggingSystem,Log4j2LoggingSystem等实现,从而实现支持不同日志模块。

在应用启动的时候,spring会调用org.springframework.boot.logging.AbstractLoggingSystem#initialize方法对日志系统进行初始化。如果在profile中指定了配置的位置(通过logging.file),则会按照指定的目录寻找并加载配置,否则会扫描项目并根据不同日志系统的默认配置路径寻找配置文件。

1
2
3
4
5
6
7
8
9
10
11
12
13
14
15
16
17
18
public void initialize(LoggingInitializationContext initializationContext,
String configLocation, LogFile logFile) {
// 指定了配置文件目录
if (StringUtils.hasLength(configLocation)) {
initializeWithSpecificConfig(initializationContext, configLocation, logFile);
return;
}
// 从默认路径中寻找配置文件
initializeWithConventions(initializationContext, logFile);
}

private void initializeWithSpecificConfig(
LoggingInitializationContext initializationContext, String configLocation,
LogFile logFile) {
// 根据目录加载日志文件
configLocation = SystemPropertyUtils.resolvePlaceholders(configLocation);
loadConfiguration(initializationContext, configLocation, logFile);
}

在进入initializeWithConventions后,会先扫描不同日志系统定义的默认配置路径并找到配置文件(getSelfInitializationConfig)。在getSelfInitializationConfig这个方法中调用了getStandardConfigLocations获得默认配置路径

1
2
3
4
5
6
7
8
9
10
11
12
13
14
15
16
17
18
19
20
21
22
23
24
25
private void initializeWithConventions(
LoggingInitializationContext initializationContext, LogFile logFile) {
// 获取当前日志系统的默认配置文件
String config = getSelfInitializationConfig();
if (config != null && logFile == null) {
// self initialization has occurred, reinitialize in case of property changes
reinitialize(initializationContext);
return;
}
// 未在classpath下找到默认配置文件,则寻找spring定制的配置文件
if (config == null) {
config = getSpringInitializationConfig();
}
if (config != null) {
loadConfiguration(initializationContext, config, logFile);
return;
}
loadDefaults(initializationContext, logFile);
}

protected String getSelfInitializationConfig() {
return findConfig(getStandardConfigLocations());
}


getStandardConfigLocations是一个抽象方法,不同的日志系统都进行了自己的实现。logback提供的文件名称如下,可以看到并没有logback-spring文件。

1
2
3
4
5
@Override
protected String[] getStandardConfigLocations() {
return new String[] { "logback-test.groovy", "logback-test.xml", "logback.groovy",
"logback.xml" };
}

而findConfig方法则在classpath下按照这些文件名称逐个寻找,并返回找到的第一个配置文件。
当没有在classpath下找到默认配置文件,则寻找spring定制的配置文件,spring配置文件本质上是在默认配置文件名称后加上-spring后缀并在classpath中进行检索、

1
2
3
4
5
6
7
8
9
10
protected String[] getSpringConfigLocations() {
String[] locations = getStandardConfigLocations();
for (int i = 0; i < locations.length; i++) {
String extension = StringUtils.getFilenameExtension(locations[i]);
locations[i] = locations[i].substring(0,
locations[i].length() - extension.length() - 1) + "-spring."
+ extension;
}
return locations;
}

而当上述方法都没有找到配置的时候,就会加载日志系统提供的默认配置。logback的配置如下:

1
2
3
4
5
6
7
8
9
10
11
12
13
@Override
protected void loadDefaults(LoggingInitializationContext initializationContext,
LogFile logFile) {
LoggerContext context = getLoggerContext();
stopAndReset(context);
LogbackConfigurator configurator = new LogbackConfigurator(context);
context.putProperty("LOG_LEVEL_PATTERN",
initializationContext.getEnvironment().resolvePlaceholders(
"${logging.pattern.level:${LOG_LEVEL_PATTERN:%5p}}"));
new DefaultLogbackConfiguration(initializationContext, logFile)
.apply(configurator);
context.setPackagingDataEnabled(true);
}

那么为什么这里springprofile没有生效呢。打断点发现在getSelfInitializationConfig查找日志系统默认配置文件时就找到了对应的logback.xml文件,从而不会再查找spring定制化配置文件(即默认配置文件的优先级高于spring配置文件)。而这个logback文件是依赖的别的包引入的logback配置,从而阻碍了spring-boot文件的加载(这里也顺便说一下,提供给别人的二方包中正确的做法是不要引入日志的配置文件~)。具体从哪个依赖包中引入的可以从springboot的启动日志中看到:

这个问题的解决方法有两个:

  1. 将自己的logback-spring文件声明成logback或logback.test.xml,它会覆盖别的包引入的logback配置,但是会导致部分spring标签失效
  2. 使用logging.config指定配置文件路径,这个配置可以是在application.properties文件中声明,也可以是在启动命令参数中用-Dlogging.config在启动时声明

总结

断点是一个好工具,多多使用,熟能生巧。

https://www.baeldung.com/spring-boot-logging
#前言
相信在阅读本文前,大家在开发过程中已经或多或少的接触过程序配置这个概念,比如数据库链接配置、线程池配置、日志文件配置等。这些配置有多种多样的表现形式,或者是通过静态常量的方式在代码中声明并引用,或者是通过动态配置中心实现分布式配置管理,或者是通过环境变量和程序启动参数。上面讲的概念大家或许熟悉或许陌生,但是已经足以说明配置方式的多样性。再加上如今互联网推行敏捷研发流程,程序从研发到上线要经历多套环境,这些环境之间的配置往往不同,比如需要访问不同的数据源,或者是打印不同级别的日志。springboot就针对多环境的特性提供了支持多套配置文件的方案,从而使得同一套代码在不同的环境下用不同的配置运行。

与此同时,这也增加了配置的复杂度。不知你是否也曾经打开一个Spring项目,看到里面一堆配置文件,完全不知道当前生效的是哪个配置文件,或者某一个变量在特定场景下的取值。本文就将对SpringBoot的配置文件进行介绍,它将帮助你:

  1. 搭建一个读取配置文件的SpringBoot项目
  2. 了解SpringBoot支持的多种配置文件类型和解析变量类型
  3. 了解多配置文件场景下配置的优先级
  4. 其它高级玩法

快速上手

demo地址:

假设我们现在需要声明一个变量databaseUrl,并且需要在代码中读取这个变量来连接数据库,伪代码如下:

1
JDBC.createConnection("mysql", ${databaseUrl});

那么我们首先需要在application.properties文件中声明这个变量并赋值:

1
2
todo

接着我们需要在代码中访问这个变量的值,spring提供了多种方式来访问配置信息,这里先介绍最常用的一种,通过在属性上引入@Value注解来注入属性值,代码如下:

1
todo

这里要注意@Value一定是在Spring上下文中才会生效,如果当前的类没有通过@Component等注解注册为SpringBean的话,该配置不会生效。而访问配置的代码就十分简单,直接在bean中引用该属性即可获得配置的值。

但是,上面这段逻辑,在代码中使用静态变量也能够起到同样的效果,何须那么麻烦的单独抽出一个配置文件来管理数据库链接信息。这里就要引入Spring Properties的真正使用场景:在不同的环境中

properties or yaml

配置注入的N种方法

基础玩法

多种类型映射和类型校验

配置文件优先级

支持的配置渠道包括properties文件,yaml文件,环境变量和命令行参数

常用的配置

高级玩法

随机数

自定义转换器

通用实践

阅读全文 »

题目要求

Given a non-empty array of numbers, a0, a1, a2, … , an-1, where 0 ≤ ai< 231.

Find the maximum result of ai XOR aj, where 0 ≤i,j<n.

Could you do this in O(n) runtime?

Example:

Input: [3, 10, 5, 25, 2, 8]

Output: 28

Explanation: The maximum result is 5 ^ 25 = 28.

现有一个非空的整数数组,问如何能够找出整数数组中两个整数的异或结果的最大值。

阅读全文 »

题目要求

1
2
3
4
5
6
7
8
9
10
11
12
Given an integer array, your task is to find all the different possible increasing subsequences of the given array, and the length of an increasing subsequence should be at least 2.

**Example:**

**Input:** [4, 6, 7, 7]
**Output:** [[4, 6], [4, 7], [4, 6, 7], [4, 6, 7, 7], [6, 7], [6, 7, 7], [7,7], [4,7,7]]

**Note:**

1. The length of the given array will not exceed 15.
2. The range of integer in the given array is [-100,100].
3. The given array may contain duplicates, and two equal integers should also be considered as a special case of increasing sequence.

现有一个无序的整数数组,要求找到所有递增的子序列。

阅读全文 »

题目要求

1
2
3
4
5
6
7
8
9
10
11
12
13
14
15
Find the largest palindrome made from the product of two n-digit numbers.

Since the result could be very large, you should return the largest palindrome mod 1337.

**Example:**

Input: 2

Output: 987

Explanation: 99 x 91 = 9009, 9009 % 1337 = 987

**Note:**

The range of n is \[1,8\].

函数传入整数n,要求计算出由n位数相乘得出的最大回数时多少。
比如n=2时,由两位数相乘得出的最大回数为9009=99*91,因为可能回数过长,超过int的范围,所以讲结果对1337求余后返回。

阅读全文 »

题目要求

1
2
3
4
5
6
7
8
9
10
11
12
13
14
15
16
17
18
19
20
21
22
23
24
Given the radius and x-y positions of the center of a circle, write a function randPoint which generates a uniform random point in the circle.

Note:

1. input and output values are in floating-point.
2. radius and x-y position of the center of the circle is passed into the class constructor.
3. a point on the circumference of the circle is considered to be in the circle.
4. randPoint returns a size 2 array containing x-position and y-position of the random point, in that order.

Example 1:
Input:
["Solution","randPoint","randPoint","randPoint"]
[[1,0,0],[],[],[]]
Output: [null,[-0.72939,-0.65505],[-0.78502,-0.28626],[-0.83119,-0.19803]]

Example 2:
Input:
["Solution","randPoint","randPoint","randPoint"]
[[10,5,-7.5],[],[],[]]
Output: [null,[11.52438,-8.33273],[2.46992,-16.21705],[11.13430,-12.42337]]

Explanation of Input Syntax:

The input is two lists: the subroutines called and their arguments. Solution's constructor has three arguments, the radius, x-position of the center, and y-position of the center of the circle. randPoint has no arguments. Arguments are always wrapped with a list, even if there aren't any.

假设现在已知圆的圆心的x和y坐标,以及该圆的半径radius。要求写一个随机点生成器,要求该生成器生成的点必须在圆内,且每一个点被生成的概率为相等的。规定圆周上的点也属于圆内。

思路1:Rejection Sampling

该思路很简单,即取能够容下该圆的最小正方形,并且随机生成该正方形内的点。如果点不在圆内,则继续重新生成。正方形内等概率的随机点很好生成,可以直接利用JAVA内置的随机数生成器即可。x坐标的随机数范围为[x-radius, x+radius], y坐标的随机数范围为[y-radius, y+radius]。代码如下:

1
2
3
4
5
6
7
8
9
10
public double[] randPoint2() {
double x0 = x_center - radius;
double y0 = y_center - radius;
while(true) {
double xg = x0 + Math.random() * radius * 2;
double yg = y0 + Math.random() * radius * 2;
if (Math.pow((xg - x_center) , 2) + Math.pow((yg - y_center), 2) <= radius * radius)
return new double[]{xg, yg};
}
}
阅读全文 »

开篇

在很久之前粗略的看了一遍《Java8 实战》。客观的来,说这是一本写的非常好的书,它由浅入深的讲解了JAVA8的新特性以及这些新特性所解决的问题。最近重新拾起这本书并且对书中的内容进行深入的挖掘和沉淀。接下来的一段时间将会结合这本书,以及我自己阅读JDK8源码的心路历程,来深入的分析JAVA8是如何支持这么多新的特性的,以及这些特性是如何让Java8成为JAVA历史上一个具有里程碑性质的版本。

Java8的新特性概览

在这个系列博客的开篇,结合Java8实战中的内容,先简单列举一下JAVA8中比较重要的几个新特性:

  1. 函数式编程与Lambda表达式
  2. Stram流处理
  3. Optional解决空指针噩梦
  4. 异步问题解决方案CompletableFuture
  5. 颠覆Date的时间解决方案

后面将针对每个专题发博进行详细的说明。

阅读全文 »

题目要求

1
2
3
4
5
6
7
8
9
10
11
12
13
14
15
16
17
18
19
20
21
22
23
24
A magical string S consists of only '1' and '2' and obeys the following rules:

The string S is magical because concatenating the number of contiguous occurrences of characters '1' and '2' generates the string S itself.

The first few elements of string S is the following: S = "1221121221221121122……"

If we group the consecutive '1's and '2's in S, it will be:

1 22 11 2 1 22 1 22 11 2 11 22 ......

and the occurrences of '1's or '2's in each group are:

1 2 2 1 1 2 1 2 2 1 2 2 ......

You can see that the occurrence sequence above is the S itself.

Given an integer N as input, return the number of '1's in the first N number in the magical string S.

Note: N will not exceed 100,000.

Example 1:
Input: 6
Output: 3
Explanation: The first 6 elements of magical string S is "12211" and it contains three 1's, so return 3.

这题是描述了一个魔法字符串,该字符串完全由数字1和2构成。这个字符串的魔法点在于,如果将该该字符串连续的数字数量进行统计并且构成一个新的字符串,会发现新的字符串与原来的字符串完全相同。
比如1 22 11 2 1 22 1 22 11 2 11 22字符串,经过统计后发现有1个1,2个2,2个1,1个2,1个1,2个2,1个1,2个2,2个1,1个2,2个1,2个2,将统计的数量合并为新的字符串,会发现新的字符串为1 22 11 2 1 22 1 22,和原字符串完全匹配。

阅读全文 »
0%